 Save to Pinterest
 Steam was still curling from the kettle when I first tried my hand at these spring onion pancakes on a rainy afternoon. The sizzle of oil in the pan instantly brightened the kitchen, and the aroma of scallions sneaking through those flaky layers was nothing short of irresistible. On my first attempt, I nearly forgot the salt in the dough, but the forgiving simplicity of this recipe brought everything together. I never realized just how much satisfaction could be packed into a stack of crispy, savory pancakes. These quickly won over even the most skeptical snackers in my house.
One evening I made these for friends who dropped by unannounced, and the laughter in the kitchen mingled with the crackle of frying pancakes. We ended up eating them straight off the stove, barely bothering with plates, dunking pieces into soy sauce as everyone waited for the next hot round. I never would have guessed these would become a staple for impromptu gatherings, but that night sealed it. Now theyre my go-to when I want to serve something familiar yet irresistible. Theres always someone that asks for the recipe on the way out the door.
Ingredients
- All-purpose flour: Sifting before mixing gives a smoother dough and helps those flaky layers.
- Boiling water: Pouring boiling water onto the flour changes its texture—be careful not to splash.
- Cold water: Adding this after creates the perfect balance so your dough feels just stretchy enough but not sticky.
- Salt: Divided for dough and sprinkling inside, this is crucial for flavor—dont skimp or you might regret it later.
- Spring onions (scallions): Use both green and white parts for brightness and deeper savory notes.
- White pepper (optional): Adds a gentle heat that lingers (I skip it if making for kids).
- Vegetable oil: A good brush on each layer ensures ultra crispness on the outside.
Tired of Takeout? 🥡
Get 10 meals you can make faster than delivery arrives. Seriously.
One email. No spam. Unsubscribe anytime.
Instructions
- Mix the Dough:
- Pour boiling water over flour and salt in your largest bowl, stirring quickly as the flour thickens. Add cold water and knead until the dough turns smooth under your hands, then let it rest beneath a damp cloth.
- Shape the Pancakes:
- Cut your dough into four equal pieces and roll each into a little ball to start the process right.
- Build the Layers:
- Roll your first ball thin, brush it with oil, scatter salt and lots of spring onion over the surface, and roll it up tightly like a jelly roll.
- Spiral and Flatten:
- Twist that roll into a spiral—like a snail shell—then tuck the end underneath and gently press down with your palm to form a puck shape.
- Roll Out the Discs:
- With a gentle touch, flatten each spiral into a six-inch disc, feeling the flecks of green give a little resistance as you go.
- Fry to Perfection:
- Heat oil in a nonstick pan, letting each pancake sizzle until you see golden patches and hear that faint crackle—about two to three minutes per side.
- Slice and Serve:
- Drain on a paper towel and slice into wedges while still hot; youll want to eat them right away for maximum crispness.
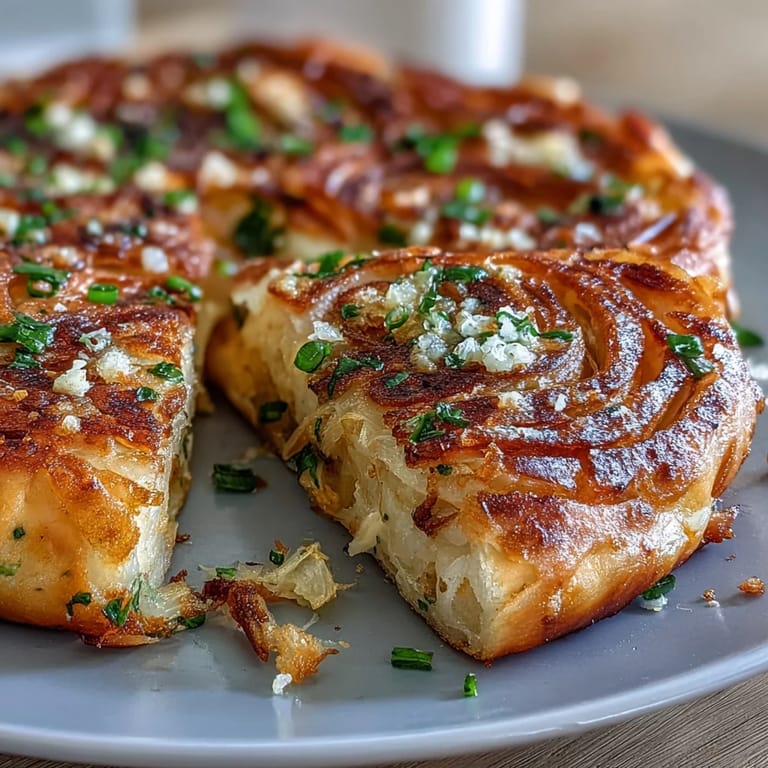
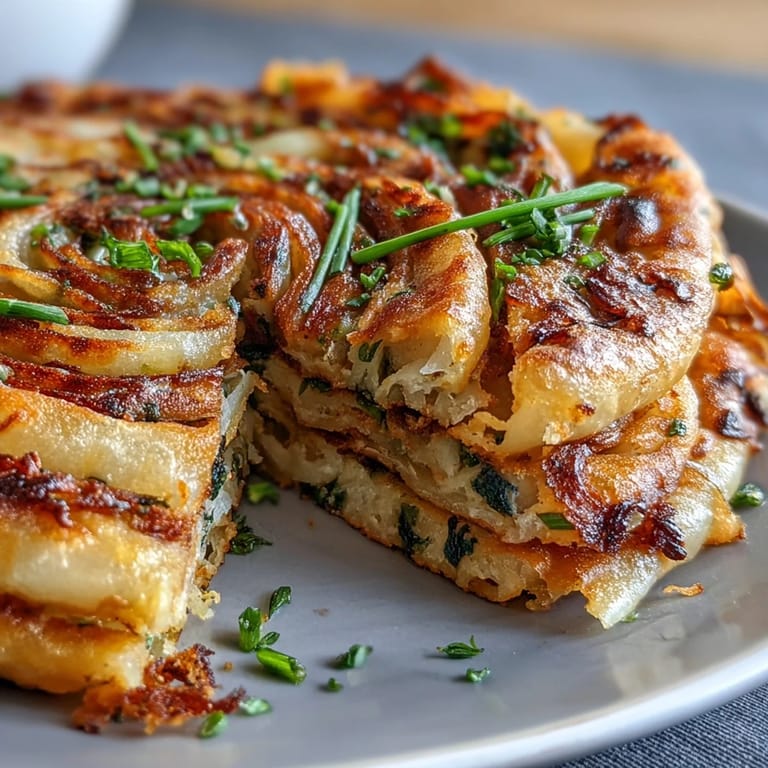
 Save to Pinterest
 There was a weekend when a batch of these pancakes turned brunch into something unexpectedly special. As the sun streamed through, we ate them with pickled cucumbers and hot tea, and suddenly the ordinary morning took on a cozy, memorable rhythm. It’s astonishing how a humble pancake can anchor a moment, making it feel like more than just another meal.
Rolling Them Extra Thin
When I started rolling my dough extra thin, I worried it might tear. But that’s actually how you get the most delicate, delightful layers—just use plenty of flour on your countertop and don’t press too hard. If you spot a tiny hole, don’t stress; it will disappear as the pancake cooks and crisps up. Trust yourself and keep going.
Serving Suggestions Everyone Loves
Though delicious on their own, these pancakes are endlessly versatile when it comes to serving. Try dolloping on some chili crisp or dipping into simple soy sauce for a punchy kick. Sometimes Ill add them to a plate of dumplings or pair with sliced cucumber for a lighter touch. If you make them for a party, cut them into small wedges for easy sharing.
What to Do with Leftovers
If you find yourself with leftover pancakes (which doesnt happen often), stash them in an airtight container and reheat in a dry skillet to restore their crispy edge. They also make a fantastic lunchbox surprise the next day, and are sturdy enough to hold up to travel. Reheating in the microwave makes them chewy, so avoid that if you can.
- Layer with parchment to keep pancakes from sticking together.
- Try stuffing leftovers into wraps with fresh veggies.
- Don’t forget to enjoy them with different dipping sauces each time.
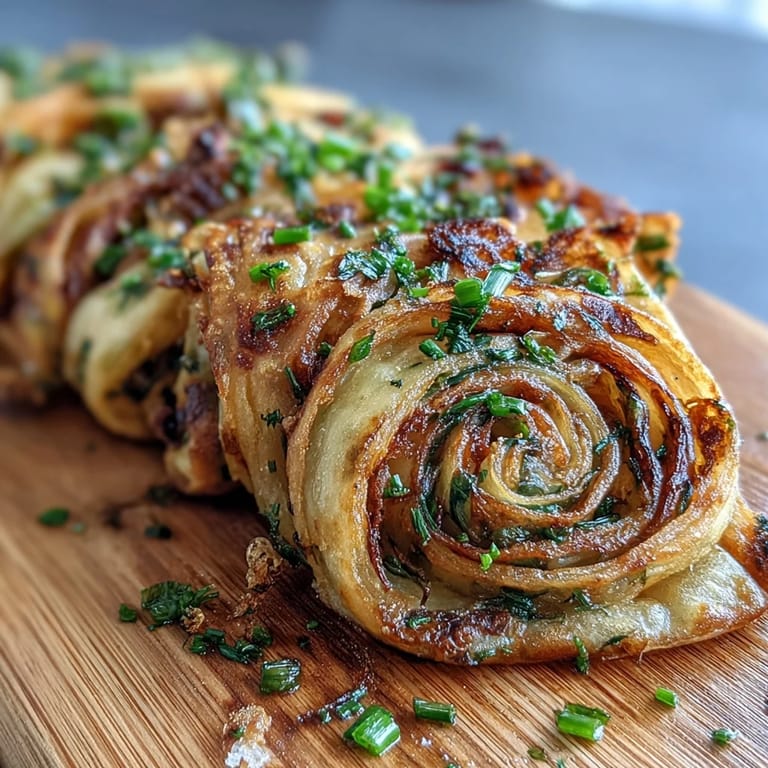
 Save to Pinterest
 Sharing a hot plate of these golden pancakes always sparks conversation—they have a way of drawing people in with every bite. I hope your kitchen fills with that same savory aroma and the promise of a snack well worth the try.
Recipe Q&A
- → How do I achieve flaky layers?
Brush each rolled sheet generously with oil before adding scallions and rolling. The roll-and-coil technique traps thin oil-lined layers; rest the dough before rolling to relax gluten for easier shaping.
- → Can the dough be prepared ahead of time?
Yes. After kneading, wrap the dough tightly and refrigerate up to 24 hours. Bring to room temperature and knead briefly before rolling. You can also freeze individual dough balls and thaw overnight in the fridge.
- → What oil is best for frying?
Use a neutral oil with a high smoke point, such as vegetable, canola, or peanut oil. Heat the skillet over medium so the exterior crisps without burning while the inside cooks through.
- → How should I reheat leftovers to keep them crisp?
Reheat in a dry skillet over medium heat for a few minutes per side to restore crispness. A low oven (around 300°F / 150°C) on a rack also works; avoid the microwave, which makes them soggy.
- → Can I add other flavors to the filling?
Yes. Finely chopped garlic, toasted sesame seeds, or a pinch of white pepper add depth. Avoid wet ingredients that release moisture; sautéed fillings should be well-drained before using.
- → Are there gluten-free options?
Substituting gluten-free flour blends is possible but texture will differ and layers may not be as elastic. Resting time and extra oil help, but a small test batch is recommended to adjust hydration.