 Save to Pinterest
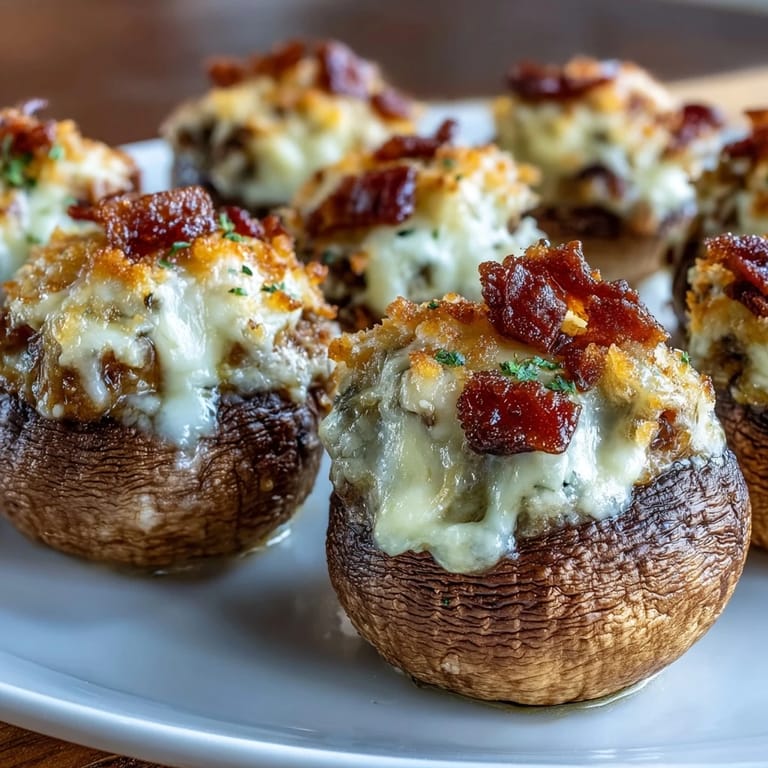
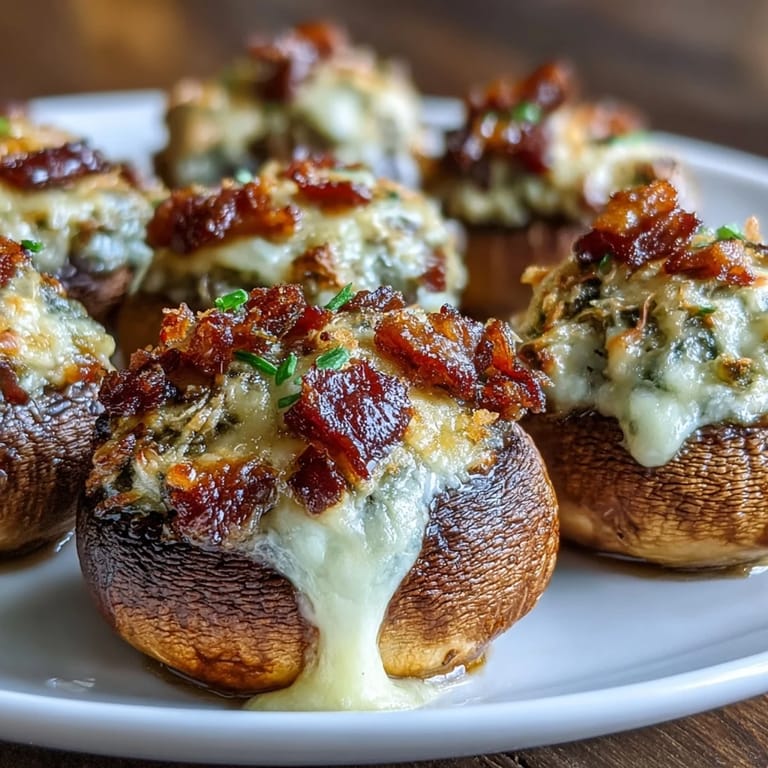
 My coworker Sarah brought these to our office potluck last spring, and I watched people gravitate toward them like moths to a flame, completely bypassing the veggie platter. She mentioned offhandedly that they were keto, and I remember thinking that didn't matter one bit—they were just genuinely delicious. The moment I bit into one, that creamy cheese mingling with crispy bacon inside a tender mushroom cap, I knew I had to recreate them at home. Turns out, the secret wasn't some complicated technique; it was just knowing how to let good ingredients work together.
I made these for my brother's game night last month, and honestly, I was nervous because I'd never cooked mushrooms this way before. He and his friends demolished the entire batch in about ten minutes, barely pausing between bites and the show on TV. That's when I realized these weren't just a side dish—they were the main event, a little savory package that convinced everyone low-carb eating could actually taste like indulgence.
Ingredients
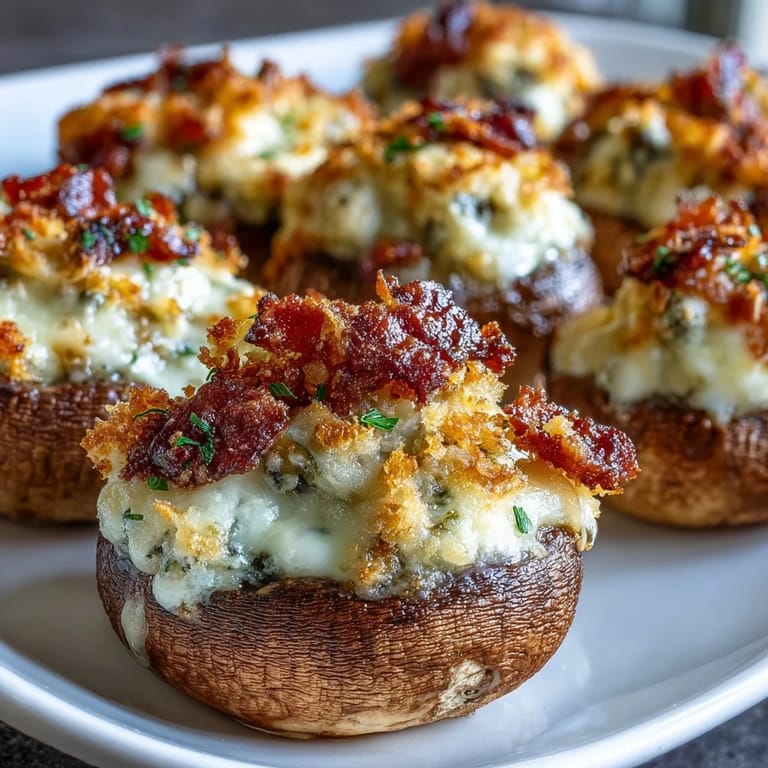
- Large mushrooms (16 caps): Look for ones that are firm and relatively uniform in size so they cook evenly; cremini or white button mushrooms both work beautifully, and you'll use the stems for extra umami in the filling.
- Bacon (4 slices, finely chopped): Don't rush this step—crispy bacon is non-negotiable here, and that rendered fat becomes liquid gold for sautéing your mushroom bits.
- Cream cheese (1/2 cup): Soften it at room temperature for about thirty minutes so it blends smoothly with the other cheeses without lumps.
- Cheddar cheese (1/2 cup shredded): Use quality cheese if you can; it makes a noticeable difference in flavor, and freshly shredded melts more gracefully than pre-packaged.
- Parmesan cheese (1/4 cup grated): This adds a salty, sharp note that keeps the filling from tasting one-dimensional.
- Fresh parsley (2 tablespoons): Chop it finely so it distributes evenly throughout, adding brightness and a hint of herbal freshness.
- Garlic cloves (2 cloves, minced): Mince them small and cook them briefly so they soften and lose their harsh edge.
- Black pepper and smoked paprika: The paprika is optional but worth including; it adds a subtle warmth and complexity that elevates the entire dish.
Tired of Takeout? 🥡
Get 10 meals you can make faster than delivery arrives. Seriously.
One email. No spam. Unsubscribe anytime.
Instructions
- Get your oven ready and prep the mushrooms:
- Preheat to 375°F and line your baking sheet with parchment so nothing sticks. Clean those mushroom caps gently—I use a damp paper towel rather than rinsing them, as mushrooms absorb water like tiny sponges and you want them to brown nicely.
- Cook the bacon until it shatters:
- Medium heat is your friend here; rush it on high and you'll end up with rubbery strips. Once it's crispy and golden, pull it out with a slotted spoon and let it drain on paper towels while you leave about a tablespoon of that precious fat in the skillet.
- Soften the mushroom stems and garlic:
- Toss your chopped stems into that bacon fat along with the minced garlic and let them get tender and fragrant, maybe two to three minutes. You'll notice the mushrooms start releasing their moisture—that's flavor concentrating right there.
- Build the filling with care:
- Once the sautéed mixture cools slightly, combine it in a bowl with your softened cream cheese, cheeses, bacon, parsley, and seasonings, stirring until everything is evenly mixed. Don't overmix or you risk making the texture grainy.
- Fill each cap generously:
- Spoon the mixture into your mushroom caps, piling it slightly above the rim if you're feeling generous. This creates little pockets of cheesy goodness that get golden and crispy on top.
- Bake until golden and tender:
- Twenty to twenty-five minutes at 375°F does the trick; you'll know they're done when the mushroom caps have softened and the filling tops are touched with brown. The kitchen will smell incredible at this point.
- Finish and serve warm:
- A sprinkle of fresh parsley right before serving adds color and a final whisper of freshness that ties everything together beautifully.
 Save to Pinterest
 The thing about these mushrooms is that they somehow transformed my Tuesday evening at home into something that felt a little bit special. My partner came home to the smell of bacon and cheese and mushrooms toasting in the oven, and suddenly we were both looking forward to dinner in a way that plain grilled chicken never inspired. That's when food stops being fuel and becomes a small, delicious reason to slow down.
Flavor Swaps Worth Trying
Once you've made these a time or two, you'll start dreaming up variations. I've swapped the cheddar for smoked gouda and gotten this deep, almost bacon-like richness that's phenomenal. Gruyère works beautifully too if you want something earthier and more refined-tasting. Even mozzarella creates a different character—less sharp, more melty and comforting. The structure stays the same; only the flavor profile shifts, which means you can keep making them without ever getting bored.
Timing and Temperature Matter
I learned the hard way that 400°F sounds good in theory but tends to brown the tops before the mushroom flesh fully tenderizes. Sticking with 375°F gives everything time to cook through gently; you get creamy interiors and golden, not burnt, exteriors. If you're making these ahead, you can stuff the caps, cover them with plastic wrap, and refrigerate for a few hours. Just add a few extra minutes to the baking time straight from the cold.
Serving Ideas and Make-Ahead Magic
These feel at home on a cocktail party table, nestled on a small plate as you mingle, or plated up as a fancy appetizer before a nice dinner. I've also made them for casual weeknight eating, where we just snack on them while watching a show. The filling stays fresh in the fridge for about three days, so you can prep it in advance and stuff the mushrooms when you're ready to bake. Consider these your secret weapon for never being caught without an impressive dish to bring somewhere.
- Pair them with sparkling water or a dry white wine like Sauvignon Blanc for an elevated feel.
- Make a double batch and freeze the unbaked stuffed caps in an airtight container for up to a month; bake directly from frozen, adding five to ten extra minutes.
- If you love heat, sprinkle a tiny pinch of red pepper flakes into the filling or over the tops just before baking.
 Save to Pinterest
 There's something wonderfully satisfying about a dish this simple that tastes like you spent way more effort than you actually did. Every time you make these, you're going to feel a little bit proud.
Recipe Q&A
- → Can I substitute cheeses in this dish?
Yes, cheddar can be swapped for gouda or mozzarella to vary flavor and texture.
- → How do I ensure the mushrooms don’t become soggy?
Remove stems and sauté them before mixing to reduce moisture; baking on parchment helps keep them firm.
- → Is it possible to make this dish spicier?
Adding red pepper flakes to the filling introduces a pleasant spicy kick without overpowering the other flavors.
- → What type of mushrooms work best here?
Large white or cremini mushrooms hold the filling well and bake evenly for the best results.
- → Can this be prepared ahead and reheated?
Yes, assemble in advance and bake just before serving to retain freshness and texture.