 Save to Pinterest
 I'll never forget the first time I created a sculptural cheese landscape for my sister's engagement party. I'd been inspired by a travel show where they showcased dramatic mountain ranges, and I thought, why not translate that majesty onto a board? As I stood there arranging those golden Manchego peaks and nestling creamy Brie into the valleys, something magical happened. My guests didn't just eat—they explored, discovering flavor combinations they never would have found on a traditional flat board. That moment taught me that food is as much about the experience as it is about taste.
I remember my friend Sarah walking into my kitchen and actually gasping when she saw the finished board. She spent twenty minutes just photographing it from different angles before we even started eating. That's when I realized this isn't just about cheese anymore—it's about creating a moment, an experience that lingers in memory long after the last cracker is gone.
Ingredients
- Aged Manchego (150 g): This Spanish treasure has a rich, slightly caramel-like flavor that works beautifully as your tallest peaks. Cut it into irregular chunks rather than perfect shapes—the asymmetry is what makes this landscape feel authentic and dramatic.
- Parmigiano-Reggiano (150 g): Break this into rugged shards instead of cutting it. The crystalline texture catches light and creates visual depth, plus its nutty intensity anchors your flavor story.
- Aged Cheddar (150 g): Slice into tall triangles to add warmth and earthiness. The orange-gold color is essential for making your mountains look alive.
- Brie (100 g): Cut thick wedges rather than thin slices—you want them to feel substantial as they nestle into your landscape's base. Their creamy softness provides the gentle transition from peak to valley.
- Gorgonzola (100 g): Break into rustic, irregular pieces. The veining and blue-grey color add unexpected visual drama and a bold flavor contrast.
- Red Grapes (1 cup, halved): These are your valleys' jewels. Halving them reveals their translucent beauty and makes them easier to eat in combination with cheese.
- Cherry Tomatoes (1 cup, halved): Fresh acidity that cleanses the palate between cheese bites. The halves show their gorgeous interior.
- Cucumber (1 small, sliced into rounds): Watery, refreshing contrast. These rounds become little pedestals for other ingredients.
- Apple (1 small, thinly sliced): The subtle sweetness bridges hard and soft cheeses. Slice thin so they drape naturally across your landscape.
- Dried Apricots (1/2 cup): Concentrated sweetness that feels like little treasures hidden in valleys. Their wrinkled texture adds visual interest.
- Roasted Almonds (1/2 cup): These are your boulders—scattered strategically to add texture and a savory crunch that complements everything.
- Walnuts (1/2 cup): Similar role to almonds but with earthier flavor notes that deepen the overall experience.
- Baguette Slices (12): Toast these lightly if you prefer them crisp, or keep them soft—either works. They're the paths through your landscape.
- Assorted Crackers (12): Choose varieties with different textures. Some should be delicate, others substantial, so the board feels varied and inviting.
- Honey (2 tbsp): This is your edible gold. Drizzle it strategically over harder cheeses where it pools beautifully, or let it glisten over Brie for a luxurious touch.
- Fresh Rosemary Sprigs: These become your forest elements, adding aroma and visual height variation throughout.
Tired of Takeout? 🥡
Get 10 meals you can make faster than delivery arrives. Seriously.
One email. No spam. Unsubscribe anytime.
Instructions
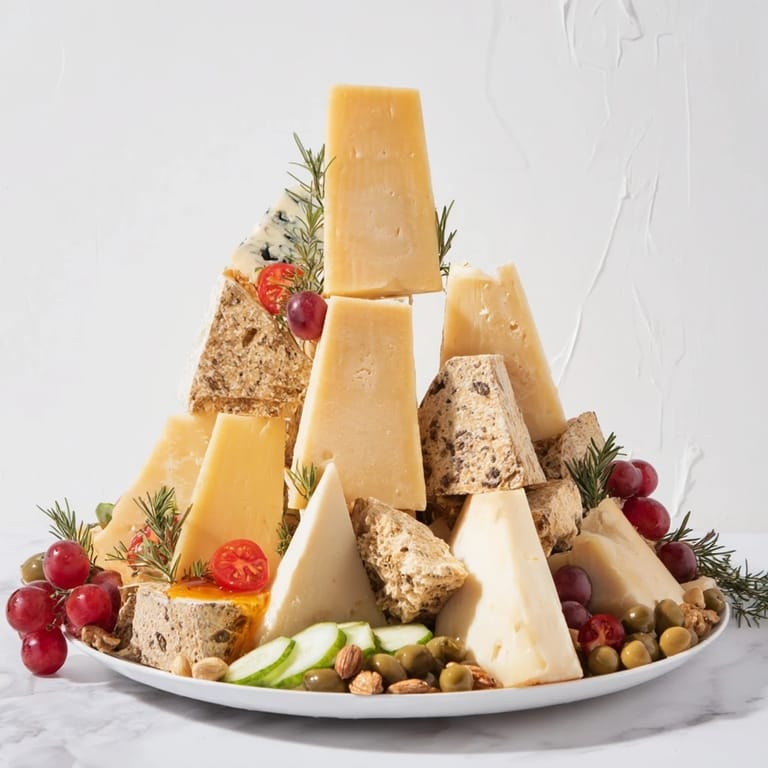
- Establish Your Mountains:
- Start by arranging your hard cheese chunks vertically on your board. Stand them at varying heights—some taller, some shorter—so they create that dramatic peak effect. Don't make them too uniform; nature isn't perfectly symmetrical, and neither should your landscape be. These cheeses are your anchors; everything else builds around them.
- Create Your Hills:
- Now nestle the soft Brie wedges and Gorgonzola pieces around the base of your hard cheese mountains. These should feel like they're supporting the peaks, creating gentle slopes that lead the eye downward and outward. Leave pockets of space—these are your valleys waiting to be filled.
- Fill the Valleys:
- This is where the magic happens. Cluster your grapes, cherry tomatoes, cucumber rounds, and apple slices into the lower areas and along the slopes. Think of them as filling a landscape gradually—some areas should feel abundant, others sparse. The variation keeps it interesting.
- Scatter Your Boulders:
- Distribute the roasted almonds and walnuts around the board. Tuck some into crevices between cheeses, let others sit prominently on flatter areas. These nuts add textural interest and prevent the landscape from feeling too smooth.
- Create Paths and Plateaus:
- Arrange your baguette slices and crackers along the edges and across open spaces like little paths winding through the landscape. This creates visual movement and makes clear where guests should start their culinary exploration.
- Add Golden Details:
- Drizzle honey in small pools—let it sit in the natural pockets created by your arrangement, or let it cascade slightly down soft cheeses for visual drama. The honey catches light and adds that final touch of luxury.
- Plant Your Forest:
- Tuck fresh rosemary sprigs throughout at varying heights. These add aroma, visual height variation, and that forest-like feeling that makes the whole thing feel intentional and alive.
- Serve and Encourage Exploration:
- Present this with confidence and invitation. Tell guests to explore, to find their own flavor combinations, to build little bites that make sense to their palate. The interactive nature is what transforms this from a cheese board into an experience.
 Save to Pinterest
 What I treasure most about this board is watching people interact with it differently. Some guests become contemplative, studying the landscape like it's an actual geography. Others become playful, asking permission to dismantle a section to build their ideal bite combination. That transformation from admiration to participation is when you know you've succeeded—the food becomes less about sustenance and more about connection.
Building Your Flavor Story
The beauty of this sculptural approach is that it guides your guests through a natural flavor progression. Start by tasting the hard cheeses on their own—their complex, nuanced flavors deserve that attention. Move to the soft cheeses, which coat your palate with creaminess. Then use the fruits, vegetables, and nuts to refresh and reset between bites. Finally, the bread and crackers become the framework that lets you combine whatever speaks to you in that moment. It's a choreographed tasting experience that feels entirely spontaneous.
Making It Your Own
Once you understand the principles of this landscape—tall things in back or center, soft things nestled at bases, fruits and vegetables filling valleys, and accents scattered strategically—you can adapt it to whatever ingredients inspire you. Regional cheeses tell different stories. Substituting dried figs for apricots shifts the entire flavor profile. Adding cured meats transforms it into something more substantial. The structure remains the guide, but the specifics become your artistic choice. I've made versions with goat cheese mountains, versions where pomegranate seeds became my jewels, versions with edible flowers creating little meadows. Each one told a different story, but they all shared that same magic of making people pause and engage.
Presentation and Timing Tips
The best time to assemble this is no more than two hours before serving—you want everything fresh and visually vibrant. However, the actual hands-on assembly takes maybe 20-25 minutes once you've prepped your ingredients, so don't let the presentation intensity intimidate you. Have a large, beautiful board ready (wood feels more intentional than ceramic for this particular creation), and gather all your ingredients nearby. The actual assembly becomes almost meditative—arranging, stepping back to assess, adjusting until it feels right. This is when the sculptural aspect becomes real.
- Keep your cheese knives nearby on a small plate so guests can cut their own pieces rather than feeling like they need to eat what's pre-cut.
- Have small forks or picks available—they make it easier to grab grapes, nuts, and other tiny treasures without using fingers.
- If you're serving this at a party, consider having a second identical board ready in the kitchen so you can refresh it as guests eat.
 Save to Pinterest
 This board reminds me why I love cooking—it's not just about feeding people, it's about creating moments they'll remember. Years later, someone will mention they still think about that time they explored your cheese landscape, and that's a kind of magic you can't find in perfection.
Recipe Q&A
- → How should the cheeses be arranged?
Arrange hard cheeses vertically as tall wedges to form peaks, nestle soft cheeses at the base for hills, creating a layered landscape effect.
- → What fruits complement the cheese arrangement?
Red grapes, cherry tomatoes, cucumber rounds, apple slices, and dried apricots add fresh and sweet contrasts within the valleys.
- → How do the nuts contribute to the platter?
Roasted almonds and walnuts scattered around add crunchy texture and resemble natural boulders, enhancing the visual and mouthfeel.
- → What breads work best for this cheese display?
Thin baguette slices and assorted crackers create varied textures and form paths and plateaus along the edges of the board.
- → What finishing touches enhance the flavor and presentation?
Drizzle honey over selected cheeses and add fresh rosemary sprigs for subtle sweetness and aromatic, forest-like notes.